This guide covers Kitchenaid Dishwasher Installation & Setup with practical, technician-backed advice.
This guide covers Kitchenaid Dishwasher Installation & with practical, technician-backed advice.
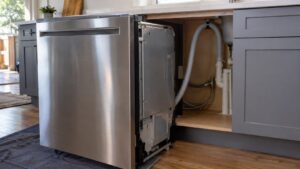
Installing a KitchenAid dishwasher requires connecting to an existing water supply line, routing a drain hose (often through an air gap or high loop to prevent backflow), wiring or plugging into a dedicated circuit, and leveling the unit under the counter — straightforward when the existing hookups are in good condition, more involved when they need updating.
Understanding the Kitchenaid Dishwasher Installation & Setup
Below, our specialists break down everything you need to know about the Kitchenaid Dishwasher Installation & Setup.
Understanding the Kitchenaid Dishwasher Installation &
Below, our specialists break down everything you need to know about the Kitchenaid Dishwasher Installation &.
Water Supply and Drain Connections
Most dishwasher replacements reuse the existing water supply line and drain routing, which keeps installation relatively quick. Problems arise when the existing supply line is old, corroded, or doesn’t match the new unit’s fitting, or when local code requires an air gap that the previous installation didn’t have. A drain that isn’t properly routed with a high loop or air gap can allow dirty sink water to siphon back into the dishwasher, so this is worth checking even on a like-for-like swap.
Electrical Requirements
KitchenAid dishwashers typically run on a dedicated 120V circuit, either hardwired or plugged into a receptacle under the sink. If your existing setup lacks a dedicated circuit — common in older homes where the dishwasher shares a circuit with other kitchen outlets — that’s a code and safety issue worth addressing before or during installation rather than after.
Fit and Cabinet Opening
Dishwasher openings are fairly standardized at 24 inches for full-size models, but height can vary between older and newer units, and cabinetry that was built tight around an old dishwasher may need slight adjustment for a new one. Check your model’s height specification against the opening before installation day, particularly if you’re replacing a dishwasher that’s more than 10 years old.
What Determines Installation Cost
Installation cost depends on whether existing supply and drain lines can be reused, whether an air gap or new shutoff valve needs to be added, whether the electrical connection needs updating, and whether the old unit needs disconnection and haul-away. A technician can quote accurately once they’ve seen the under-sink plumbing and existing connections in person.
Leveling and Final Checks
A dishwasher that isn’t properly leveled can leak at the door gasket or drain poorly, leading to standing water and eventual mold or odor issues — problems that are easy to prevent at installation but more disruptive to fix afterward. Proper installation includes leveling the unit, securing it to the countertop or adjacent cabinetry, and running a test cycle to confirm no leaks at any connection point. If your new dishwasher pairs with cycle questions once it’s running, see our ProWash cycle guide.
DIY vs. Professional Installation
A straightforward like-for-like swap with existing, code-compliant connections is sometimes manageable for a confident DIYer, but any job involving new plumbing, an added air gap, or electrical work is safer and typically faster with an experienced technician. Improperly connected water lines are one of the leading causes of under-cabinet water damage, which makes correct installation worth the investment. For related appliance planning, see our dishwasher repair cost guide, and check current KitchenAid dishwasher specifications at KitchenAid’s official site.
What to Expect on Installation Day
Most dishwasher installations are completed in under two hours when supply, drain, and electrical connections are already in place and compatible. Have the space under the sink cleared and accessible beforehand, and expect the technician to run at least a short test cycle before considering the job complete, since a leak at a fitting often doesn’t show up until water is actually running through the system.
Panel-Ready and Custom Front Models
Panel-ready KitchenAid dishwashers, designed to accept a custom cabinetry front panel, add an extra step to installation since the panel needs to be fitted and aligned in addition to the standard plumbing and electrical work. Confirm panel dimensions match your model’s mounting hardware before installation day to avoid a mismatched or crooked front panel.