A KitchenAid dishwasher drain line installation comes down to three connections and one loop: the drain hose goes to the garbage disposer or the sink drain, it rises in a high loop under the countertop before it gets there, the hot water inlet attaches to a small shutoff valve, and the machine is leveled so that water collects at the pump. Most drain problems on a new install trace back to one of two mistakes, a disposer knockout plug that was never removed or a hose that was kinked while the dishwasher was pushed into place.
How does the drain line connect on a KitchenAid dishwasher?
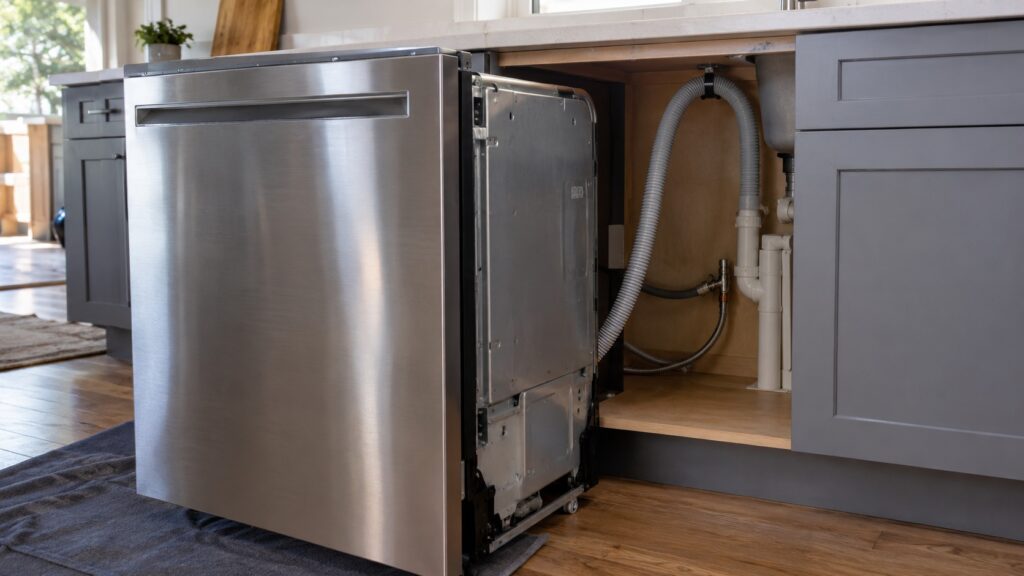
When the drain pump runs, it pushes used water through a corrugated hose at the lower left or right of the cabinet and out to your sink plumbing. The hose has to end at a place where water can run away freely, which is either the side inlet on a garbage disposer or a dedicated branch on the sink drain. Your installation sheet shows exactly where the hose leaves the cabinet and how far it can be extended, so keep it nearby and follow its limits for hose length and loop height.
The hose also has to avoid two things. It must not sag below the drain connection, because dirty water would then flow backward into the dishwasher, and it must not be pinched against the cabinet or a pipe, because a kink restricts the pump the same way a clogged filter does.
What should you do before you start the installation?
A bit of preparation saves a flooded kitchen floor. Gather the installation sheet, a bubble level, a screwdriver, pliers, an adjustable wrench, a bucket and a towel. Then:
- Shut off the power at the breaker. Do not rely on the dishwasher switch or on the wall switch for the disposer.
- Close the water supply valve under the sink and open a faucet to relieve the pressure.
- Look at the existing plumbing. If there is no disposer, find the tailpiece branch that the hose will clamp to. If you replace a unit that was there before, inspect the old clamp and fittings and replace anything that is corroded.
- Clear the opening. Make sure the cutout is clean, the floor is solid and no pipe or wire crosses the space the dishwasher will occupy.
Our general KitchenAid dishwasher installation and setup guide covers the cutout, mounting brackets and electrical box. This guide goes deeper into the drain side, since that is where most first-day leaks and slow drains start.
How do you connect the drain hose to a disposer or sink drain?
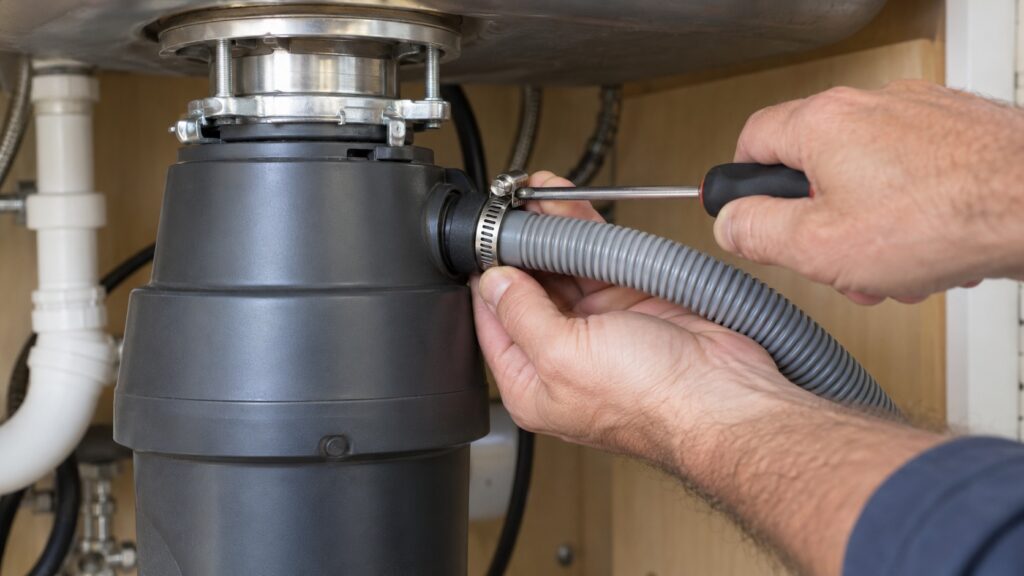
If the hose goes to a garbage disposer, the single most important step happens before you attach it. A new disposer ships with a solid plastic knockout plug inside the dishwasher inlet, and it blocks the opening completely. Knock it out from inside the disposer with a screwdriver and a light tap of a hammer, then fish the plug out of the chamber so it does not jam the grinder. If you skip this, the dishwasher will run, but the drain will never work.
- Slide the hose clamp onto the end of the drain hose.
- Push the hose fully onto the disposer inlet or the tailpiece branch.
- Tighten the clamp securely so the hose cannot slip off under pump pressure.
- Route the hose without kinks, then check that it does not touch hot or sharp parts.
If your sink has no disposer, the hose connects to a branch on the drain tailpiece in the same way, and the same loop rule applies.
What is the high loop, and do you need an air gap?
The high loop is a simple precaution. You lift the drain hose in an upside-down U so that its highest point sits against the underside of the countertop, then fasten it there with a clamp or a strap. Because water cannot easily climb back up the loop, dirty water from the sink or disposer cannot siphon back into the dishwasher when the sink is full or the disposer is running. Your installation instructions give a minimum height for the loop, and local plumbing code may call for it.
Some areas require an air gap fitting instead, which is a small chrome cylinder on the countertop or sink deck that interrupts the drain path completely. If your county requires one, the hose runs from the dishwasher to the air gap and then to the disposer or the drain. Check your local plumbing rules before you decide, and follow whichever your inspector expects.
How do you connect the water inlet and level the dishwasher?
The inlet is usually a small hot water line with a compression fitting. Flush the supply line for a few seconds into a bucket before you connect it, because debris from a fresh installation can clog the inlet screen. Tighten the nut firmly but do not over-tighten, since a cracked ferrule leaks slowly and often goes unnoticed for weeks.
Then slide the dishwasher into place slowly, watching the drain hose and the water line so they do not get pinched. Open the door, set the bubble level on the tub rail, and adjust the leveling feet until the machine is level front to back and side to side. A tilted dishwasher leaves water standing in the corners of the tub, which can cause a slow drain, poor cleaning and odor. Fasten the unit to the underside of the countertop using the mounting brackets so it cannot tip when the door is open and loaded.
How do you test for leaks and slow drains?
With the lower panel still off, turn the water and the power back on and run a short cycle. Watch the inlet fitting, the hose clamps and the drain connection while the machine fills and again while it pumps out. Dry any damp spot with a paper towel and look again after a few minutes, since a small leak shows up as a dark spot that grows. Then run a full cycle and check that the tub is empty at the end.
If the machine does not drain, the usual culprits are the disposer plug, a hose kink, a high loop that was never secured, or a clogged filter. If a drain fault code appears, our page on the KitchenAid dishwasher 8-1 code explains what the control is reporting, and our guide to a dishwasher not draining walks through the other checks in order.
When should you call a technician?
Call if you are not comfortable working with plumbing and wiring together, if the drain connection is corroded, or if the dishwasher still leaks or will not drain after you have checked the plug, the loop and the hose. Our KitchenAid dishwasher repair team can also adjust the leveling and the hose routing during a diagnostic visit. We are an independent repair company, not a factory service arm, and we will tell you when a repair is not worth doing. You can book a visit with a note about your sink plumbing and disposer.